Analyzing Your Webpack Bundle Like a Pro

👋 Hey! I'm Jakub Beneš, a Software Engineer based in Prague.
I'm passionate about scaling engineering, organizational design, and leadership. I'm a huge fan of web technologies and modern approaches within this field. While I'm a strong contributor on the frontend side, lately, I've been focusing more on the entire stack and infrastructure because there's often low-hanging fruit that can deliver a massive impact – and I enjoy seizing such opportunities. I'm not sure if I'll ever start liking YAML, though. 🤓
Welcome to today’s article, where I’m excited to share a few tips on how to analyze your application’s JavaScript bundle. Specifically, I’ll guide you through identifying the reasons behind bundling certain dependencies. Let’s dive in from the very beginning.
Recently, I was deep in debugging our fairly large React application that we have here at Outreach when I noticed some unusual behavior from React Developer Tools. Upon investigating further, I discovered that React Developer Tools was attempting to connect to a different React renderer. Which renderer, you might wonder? It turns out, it was attempting to connect to the renderer originating from react-test-renderer.
To put it simply, due to certain race conditions, it was randomly selecting either our main React renderer or the TestRenderer. This behavior was definitely unexpected — after all, the TestRenderer should only be utilized in testing scenarios. So, who was importing it? And why?
To start with, I verified that indeed we had bundled react-test-renderer as part of our production bundle. This raised several concerns, not least of which was the additional 28 Kb of download, parsing, and JavaScript execution burden imposed on our users.
As part of our CI pipeline, we utilize the Webpack Bundle Analyzer to generate outputs. With this tool at hand, I could easily use its built-in search feature to confirm my suspicions. Snap!
Now that we’ve identified the issue, the next step is to uncover how this undesired dependency made its way into the bundle. You might be tempted to simply use the search function in your IDE, and if you’re lucky, you might stumble upon its usage in App.tsx. However, in most cases, it’s not so straightforward. Our monorepo contains over 1 million lines of TypeScript code, which made me quickly realize that a more sophisticated approach was needed. 🤓
Enter Statoscope. All we require are the stats data from Webpack. The process is relatively straightforward (although in our case, we had to chain this command with node and — max-old-space-size to avoid running out of memory — a challenge we managed to overcome 😀).
webpack --json stats.json
Once we possess our stats.json file (ours was a whopping 2.1 GB), it’s a simple matter of dragging and dropping it into Statoscope — rest assured, it’s a local-first application and no data is uploaded, so don’t worry it takes just a few seconds. With Statoscope, we can then examine why the particular module was required.
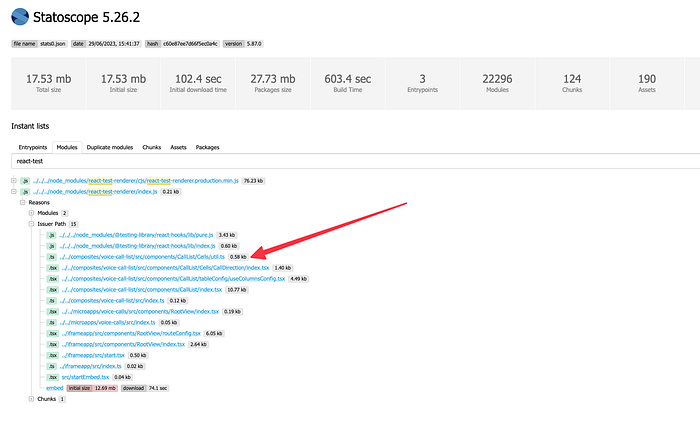
In our scenario, the root cause was clear: react-test-renderer was being required (as part of React Testing Library) within a util file that was utilized by both tests and app code. Because the code wasn’t effectively tree-shaken (given that it’s a third-party dependency and Webpack, which plays it safe, can’t be sure it doesn’t consist of side effects), it unintentionally became part of the bundle itself.
After fixing the issue by simply splitting the file into two where the one required by the app was not requiring this dependency, React Developer Tools was finally happy again! And as a nice bonus, we shaved off 28 Kb of JavaScript.
P.S: Statoscope also provides CLI tools that can seamlessly integrate into your CI/CD system, ensuring that no such unwanted dependencies make their way into the production bundle. This serves as a valuable safeguard to prevent such occurrences in the future.